Friday, May 25, 2012

FREEBIE FRIDAY.......IT'S FOR THE BIRDS!

Hi Everyone!

So this weeks challenge on the DYSU challenge site is all about the birds and this is one of my favorite themes so I thought...it's Friday.....I want to take part in the challenge....and I do have alot of bird images...lets have a Freebie Friday that is for the Birds!!!! So today I am going to share some wonderful birday images with you as well as some of my works that feature birds for inspiration and then encourage you all to hop over the the DYSU challenge to take part in their little birdy challenge! Have fun!
Oh and let us all have a happy and safe Memorial day, I will be heading up to San Antonio to do my Gecko Galz classes and if you will be in the area come check out Stamp Antonio Arts it is a stampers and altered art artisans paradise. Have a great and scrappy weekend where ever you spend it!


MY DESIGNS


PEACOCK CARD
for this card I used Gecko Galz Too Tweet digital stamp set, Prima papers, hand dyed silk ribbon and Distress inks in Peacock feathers & Vintage photo.


PEACOCK FEATHERS CARD
for this card I used Gecko Galz Dominos collage collection, May Arts duel colored ribbon, peacock colored gems by recolections, and a peacock feather I got at hobby Lobby.

ROYAL BIRD CARD
For this Card I used Gecko Galz Springtime Jewels collage sheets, May Arts black velvet ribbon, small doillie by Wilton, and paper by Paper Studio.

TWEET NOTES CARD
for this card I used Gecko Galz forth coming paper Story book Lane, also their Too Tweet digital stamp set, rusty hinge ink by Distress Ink, May Arts Ribbon, gold acrylic paint from Hobby Lobby, and Vivas Copper pearl pen.


YOUR FREEBIES


Hope you enjoy the images and to take part in the bird challenge hop over to the DYSU challenge!


Monday, May 21, 2012

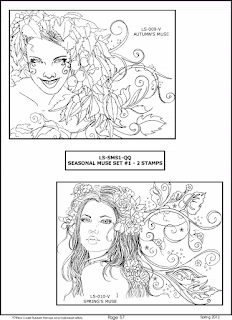
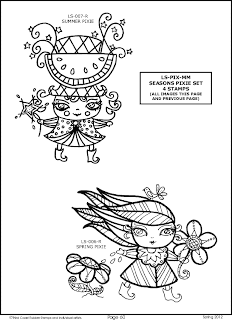
My New Stamps

Hi everyone

I am so excited because it is official my art has been made into stamps! Third coast Stamps has release several sets of stamps featuring my art work....so if you love stamping (and who doesn't) then I invite you to check out all their new stamps, but I thought I would give all of you a little preview of the stamps they are carrying...please enjoy and be sure and pop over and take a peek at all their amazing stamps!


A big shout out to a wonderful small business


Happy Scrappin
Leanne

Thursday, May 17, 2012

Summer Splash Down

As we near the end of Spring my thoughts are wandering to the beachs of summer. There is something calming and comfortable about the sea side I love the colors of summer, the sound of the waves and yes even the fresh sea smell.....though in August the smell in Galveston (which is my sea side meca) is a bit sketchy but I still will brave it if for no other reason then to place my feet in the warm waters of the gulf. So today I thought it might be fun to share with you a collection of sea inspired cards I did using Gecko Galz Splish Splash Digi stamps and their Beechy Keen digital papers and By The Sea Collage Images.
I had so much fun using them that I wanted to give you all a chance to win a set of each so you too can create some summer fun cards....so what to you have to do to perhaps win, just leave a comment on this entry and next Thursday (May 24th 2012) I will randomly select a winner....yipeeee! For now please enjoy my little card projects!


BEACHY KEEN DAY CARD
by
Leanne Seed

for this card I used Pool and Citrus Alcohol Inks on glossy paper to create my back ground piece. Then painted the sea horse using watercolor pencils. The strip behind the sea horse image is from the Beechy Keen Paper Pack. I found some wonderful citrus colored lace at Hobby Lobby in the sewing area ribbons. and the inks I used to distress the sentiment was Broken China and Shabby Shutters by Distress Ink.


HANG TEN CARD
by
Leanne Seed

Again I used the glossy paper and Lettuce colered Alchol ink to color it for my background piece. then I used a manilla tag I got at my local scrapbook store and using the same inks I used in the above card I distressed it. I took a piece of paper by My minds Eye (you can get this at Hobby Lobby) and cut a piece the size of the card top then cut in half diagonally. Adding adhesive to the bottom of one of the halves and along the left side place it along the bottom edge to form a pocket for your tag to slip down into. The tear away the bottom half of the other piece and ink the raw edge with your green ink and place at top of card. Then I took some fun beechy looking ribbon from my stash and adhereed down each side and throu the hole of the tag. And add your images to finish it off. Now one other thing I did when I gave it away was I used my personal cutter and on the tag cut small areas in each corner so I could place a gift card in the tag.


LIVE OUT LOUD CARD
by
Leanne Seed

So this is a pretty straight forward card, again I used the alcohol inks to color a glossy piece of paper as my back ground and created mats with some water inspired card stock. The image was from Gecko Galz and I jazzed it up with blue and lime green stickles. And I created the sentiment banner using Gecko Galz Celebrate Alphabet soup frames and of corse more stickles because you can never have to much bling. and then topped it with some pretty ribbon I found at Micheals and a bit of sea glass in each of the corners.


MAKE A SPLASH CARD
by
Leanne Seed

So again I used alcohol inks and glossy paper to create the background for my card. Then I watercolored the turtle stamp using water color pencils and cut it out. I took a sheet of Gecko Galz Beachy Keen paper and cut out some of the waves and layered them on the bottom of the card to create a sea scape. then slide in your turtle as a removable tag...this is great to give to kids.


AT THE SHORE CARD
by
Leanne Seed
For this card I did alot of the same techniques as the others but I found this amazing yarn that I wanted to use at Jo Annes and cris crassed it on the left side of the card then using glossy accents adhered some wonderful little shells, now if you want to use shells you collect from the shore just place them in a bowl of rubbing alchol for 24 hours this will get rid of any unwanted hitch hikers.


DIVE INTO FUN CARD
by
Leanne Seed
So like the others I used alcohol inks and glossy paper to create my back ground then placed a piece of Gecko Galz Beachy Keen paper ontop of that. Then watercolored the seashell and the funky mermais using water color crayons (I work from the tips using a small brush). using an exacto knife I cut away the face area of the mermaid and placed a vintage womans photo. Then take adhesive and add to sides and bottom of the sea shell and adhere to center of the card, this will form a pocket. Next distress your sentiment and place it at the top then slide in your mermaid. add some blue and green bling (you can find fun summer colors at Hobby Lobby) and tie a fun ribbon around the inner edge.


SUNSHINE WISHES CARD
by
Leanne Seed

Again take your glossy paper and using pool and lettuce alcohol inks color it for your background paper theb take a piece of the Beachy Keen paper and cut into a circle (if you do not have a circle cutter then you can use a small plate as your template) on the back side using your inks distress then mark very center and with ruler and exacto knife cut like a pie into wedges leaving a 1/4" around outer edge. Water color the mermaid using water color pencils and place her in the center of card. Then add circle over her and adhere then take a small container and mix glossy accents and sand (you can find the sand at micheals or JoAnnes in the floral area) and then using tooth pick place around circle and let dry completly.
Then take your wedges and pull them back exposing your mermaid and tack down using glue dots or red line tape. place a pearlat a few of the points. And last take your glossy accents and create your bubbles around the mermaid. It is a fun way to make your own aquarium.

I hope you enjoyed my little cards and have fun creating your own images!
Also hop over to DYSU Challenge blog and check out their "Landscape Challenge".


Have a happy scrappy day
Leanne

Tuesday, May 15, 2012

Template Tuesday!!!!!

So I was in crisis last week because my lovely little laptop decided to give up the ghost on me and die a most horrible death....dont you hate when that happens so as I started cleaning off my machine and started placing the files on my PC I noticed all the hidden jewels I had on my machine and thought wouldnt it be fun to share them with my blogger friends. One of the files I discovered was full of templates for cards and boxes that I fell in love with....did I mention I am a paper crafting horder? Yes I know it is a terrible thing to admit but I know I am not alone in this addiction right. So I thought it might be fun to offer you my friends a free template each Tuesday so you can hord them as I do, lol! I do use them really I do!
In any case let me start by telling you these are NOT my template designs I got them through a number of amazing sites such as Mirkwood, Stampingtom, The house of Stir Fry...oh you get the idea but thought perhaps if you had not visited these places or do not have time to seek them out you can come here each Tuesday and per take of their amazing designs. So to start things off here is a fun little template from Stampington .


 template created by Karen Thomas of Yasutomo paper company


This sample is done by artist Beryl Taylor


1. Copy template, enlarging or reducing as desired.
2. Cut out.
3. Score and fold along lines.
4. Punch holes.
5. Stamp, paint and embellish as desired.
6. Assemble and feed dowel through holes

If you do one of these amazing little boxes please share with us and send a message attached to this entry with a feed to your project!
Have fun creating a wonderful project and have a happy scrappy day!
Leanne

Monday, May 14, 2012

DELIGHTFUL RIBBONS!

As alot of you know one of my big weaknesses is ribbons...I have bins of ribbon spools in my studio and love coming up with new and unique uses for it. One of my altime favorite ribbon companies is May Arts and I thought it would be kind of fun to feature them as this weeks online shop so everyone can go take a peek at the wonderful selection they have....but I warn you, like chocolate their product is highly adictive! So first I wanted to share with you a few works I did using their ribbons, I hope you enjoy them!

SEW CUTE CARD
For this card I used May Arts ribbon BS22 in red. I also worked with Core'dinations white wash paper. Gecko Galz "Card Toppers" collage image and crop-a-dile to punch my holes.

EVERY DAY CARD
For this card I used May Arts ribbon AF16 in green and gold. I also used Core'dinations chocolate box paper, Gecko Galz "Card Toppers" collage image, stick pin and lace from my stash.

WHITE RABBIT CARD

For this card I used May Arts Ribbon ABB22 Check stitch in Pink/Orange. I also worked with Core-Dinations paper, Cuddle Bug embossing folder, Prima Flowers, Paper and image from Gecko Galz.


CREATIVE INSPIRATION PLAQUE

I had a blast doing this little inspiration plaque for my studio and for this I used May Arts Ribbon BM66 in blue and green.
I also worked with Gecko Galz images, papers and digi stamps as well as UTEE from B&J Art Stamps (they have amazing UTEE in multi colors)

COWGIRL CARD

For this card I used May Arts ribbon 363-28 Twisted Burlap red cord and C32 sheer gold ribbon. I also used Gecko Galz "Wild Wild West digital stamps" and papers by Gecko Galz. And used Copic markers to color in the image.

KICK UP YOUR HEELS MINI BOOK

for this cute little coaster book I used May Arts ribbon EA17 in pink.
I also used 4 blank 4x4 coasters, Papers & ephemera images by Gecko Galz, Hero Arts flowers, 7 gypsies jeweled dangle, paper studios pearls, and spare parts jeweled brad


LOVE NOTES CARD

For this little valentine card I worked with May Arts JD25 red sheer dot ribbon.
Also paper by Gecko Galz, Valentine Ephemera image by Gecko Galz, red stickles.

DESTINY CARD

I wanted to do a card that was a bit more masquline with fathers day approching and came up with this adventure card using May Arts Ribbon MKK04, it gave it the little pop of color the card called for! I also used glossy paper, Butterscotch Alcohol ink, papers by Paper Studio and GCD Studios and stamps by blockheads Stamps.

And now I thought it might be fun to walk you through a card that might be fun for you to create at home. The card we will be making is the following;


HAPPY SPRINGTIME CARD

Now for this card you will need the following products
white card stock
May Arts Ribbon 370-14-66
Shimmer Paints (you can use twinkling H20's, or any brand. Hobby Lobby has a great set for around $5 in the art department)
a white flower (we used prima)
a colorful button (we found ours at Jo Annes)
An embossing folder of your choice (we used a floral one by Paper Studios found at Hobby Lobby)
a piece of BO Bunny swiss dot paper in yellow
small paint brush
a natural sponge
Water in container
Archival Ink by Ranger
And fun spring stamp (ours is from Third coast stamps)

First take your card stock and cut out your 5"x10" square card base and using a bone folder score the center. 
Next take your embossing folder and emboss the top layer of your card base. Take your sponge and dip in water to make damp (you want to squeeze out excess water) and take one end and dip in your pink color shimmer paint. then with a circular motion cover top of card lightly (you do not want to press to hard because you will loose your raised area) dont worry if there are white areas left you are going to go back in with your second color (I chose a gold color) and ink areas that were missed with the pink and also over lap the two colors....this is a great way to distress paper.
While that is drying take your white flower and using your paint brush paint your first layer of color (I used the same pink that I used on the card base) then go back in with your second color and add to flower (again I used the gold, this creates a great gilted look).
 Let that dry and cut a 4"x3.5" piece from the white card stock and using your black ink stamp your image in the center (I suggest using either Ranger Archival Ink or Staz On ink when working with water based products). Next using your paint brush you will paint the image (to create great shadows use your pewter color and go along the inner edge of the design, on my card you can tell on the girls left side) also play with your colors using a plastic plate you can mix colors to create new colors. The great thing about shimmer paints is they layer and blend well. after you have painted her then you will take your brush and add paint then alot of water and do a wash for your back ground. Let it dry and then using a moist brush add an edge to your image using paint.
Now take your dot paper and cut a 4"x1.5" strip and a 4"x3" rectangle. Place the large piece on the inside of your card to stamp a sentiment on and then place the strip on the left side about 1/4" from bottom of card base. Next adhere your stamped image to the right side of your card base and in the lower left corner the flower. Using clear glue adhere your button to the center of the flower. To finish the card take your ribbon and cut 2 12" pieces and a 6" piece. Tie your two 12" pieces around the top of the card at the score line and tie into a knot. Then take your last piece and tie around other two and tie into bow. Now you are ready to send to your favorite friend!


I hope you enjoyed all my little works and please feel free to check out May Arts art


Have a happy Scrappy Day!
Leanne