There is nothing like a bit of Spring colored fripperies to get the creative juices flowing and your imagination working so I set forth to create the ultimate Spring time gift and after looking through all the amazing ribbons at May Arts I came up with my idea of doing a ribbon inspired wall plaque in Pinks and Greens. I started with my ribbons choosing to use pink and green checked ribbon (ABB46), a green and yellow sheer ombre (AE27), a vivid lime green crochet ribbon (NP46) and a sweet little pink and yellow check sheer ribbon (370-14-12).

To get started take your three piece Creative Imaginations wall plaque and using glimmer mist in "Pink Bubble Gum" mist the entire plaque and let it dry completely. Then Take your sheets of 12"x12" scrapbook paper, I chose to use Basic Grey's "Hayloft" for the green paper and Echo Park papers "Be Mine" paper and "Creative Imaginations "Marah Johnson" paper for the pink, and you will cut them into 6"x6" pieces. Take three pieces of you green paper and adhere them to your plaque pieces using liquid adhesive, I like to use Scotch "Quick Dry" for it flattens out not letting the paper pucker and tends to dry in 15 minutes. Once it is on using your paper shears cut away any excess paper from around the plaque at this time you will round the corners. The reason I did not use a corner rounder is that sometimes the corners do not match up because the rounder is to small or to large or do not punch cleanly so I prefer to do it by hand but you are welcome to use a rounder. With Exacto knife you will cut and open up slots in the plaque where they will connect together later on. Then you will take green ink I used Rangers "Peeled Paint" Distress ink and you will ink all the edges, make sure you come into the plaque about a half inch because once you start laying your ribbon along the edge you will loose that shabby chic look that the ink distressing gives it.
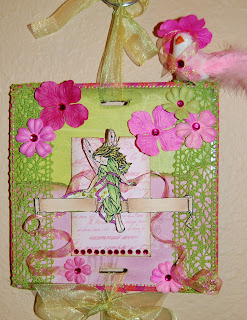
On the first plaque take your pink script paper by Creative Imaginations and tear in half horizontally making sure you tear from the top so your white core shows. Then with ink blending tool or sponge add green ink to the core. You will then take the second plaque and one piece of the
Echo Park pink paper you will tear in half vertically then tear away from each piece another 1 1/2" remembering to tear from the top to show white core. Then like before ink the torn core with green. Attach two pieces to each side of the plaque with the torn section facing inwards. And on the last plaque take piece of Marah Johnson paper and out patterned flourish and place again like the other two inking the torn edges with green then place on center of plaque.
Next using 1/2" red line tape you will run this around the outer edge of each plaque. Now the key to this is starting right above one of the slits at the top or bottom and slowly pulling it around the plaque until each end meets, do not over lap ends, you want to have a bit more hanging off the front side than the back. Once you have it all on you will fold it down onto the plaque where it is laying flat then take the red plastic from the tape and using your pink and green checked ribbon go around the plaque just as you did with the tape, this time overlap the two ends, then pres it down around the edge of your plaque. This hides any raw unfinished edges and makes a stunning ribbon border.
Next take your stamps (we used Gecko Galz Digital Fairies Stamps) and stamp them onto a piece of white cardstock or Bristol then color them with Copic Markers to match the ribbons and papers, here is a hit I love the way Copic Markers work of Smooth finished Bristol they blend better, then cut them out. You don’t have to be exact if you have a little bit of white around the edge hide it by inking with the green ink. After you have them all cut out you are ready to start assembling your plaques.

On your first plaque take two pieces of the Green Crochet ribbon and wrap them on each side to where they meet in the back and secure with red line tape on back of plaque. Then take another square of the
Echo Park script paper and using either a die cut or template cut a "Library Pocket" from the paper and once you have it together adhere to center of the plaque. To add a nice element to your pocket you might want to ink with the green ink before adhering it to plaque. Next take your stamped image and place two glue dots on her back then adhere two pieces of pink and yellow checked sheer ribbon. Take mini pop dots and adhere her over pocket letting the two ribbons dangle free. You will then take your ribbons and using mini glue dots you will begin manipulating the ribbons to appear that they are blowing in the wind. The way you will do this is lift and twist then secure to plaque with a glue dot then do it again until it looks the way you wish it to. You will then adhere flowers around the plaque, I used Prima Flowers "Got Flowers" then place adhesive glass gem in the center of each flower, and I used Mark Richards "Fusia" gems. Last take 11 small gems and run them along the bottom of your envelope.

On your second plaque take a piece of the green crochet ribbon and wrap it horizontally along the bottom of your plaque making sure not to cover the connector slot. You will attach on the back of the plaque with red line tape as before. Then take hot pink post-it pad and attach to center but half way into the crochet ribbon, you want to leave enough room for your pen ties. Next take two pieces of 8" pink and green checked ribbon and using a piece of red line tape cut to 3/4" place one on the right upper side of the plaque and one on the left make sure it is below your connecting slot. Take your ribbon and place on red line pieces to where the ribbon is vertical with plaque, then tie pen into ribbons and finish off in bow on each side.
Next take another fairy and attach two mini glue dots to her back and attach the small organza check pieces on each side. Then with mini pop dots adhere her to left side of post-it pad. Then like you did on the first plaque begin manipulating the ribbons to make them look as if they are blowing all around her. Take more prima flowers and dot around plaque and finish them with a large glass gem.
And last take paper butterfly, we used a butterfly from the Gecko Galz "Beautiful Butterflies" collage sheet, cut it out and ink the back using your green and pink inks. Then you will take a mini glue dot and run it up the body length only place on one of your flowers then lightly fold the wings up to create a 3-d element.

Now on your last plaque you will take the stamp with the fairies skipping rope and start with the one on the right side and using a glue dot adhere the small organza checked ribbon to his back and let a small piece dangle past his back, then take a second glue dot and roll into tape shape and wrap around ribbon to where it is cinched in and place under his hand so it looks as if the fairy is holding it then adhere the fairy to plaque using liquid adhesive (these will not be three dimensional). Next create a dangle between the two large fairies and attach the other end to the other large fairy leaving a tail past her back. Attach that end with a mini glue dot then adhere her down with liquid glue then place small fairy on ribbon between the other two fairies using again liquid glue.

Next take your last piece of Green paper and using template, punch or die cut you will cut two decorative frames and ink the edges in green. Take mini pop dots your will place them on three sides of each frame, you want to keep the tops open so you can slip in your sentiment and photo, then adhere to the top portion of plaque. For the sentiment I used the fall out piece of the frame and stamped a sentiment then slid it down inside the vertical frame.
Take your last fairy and with glue dots adhere her to the sentiment frame, then sprinkle with flowers and add glass gems to their centers. I added two decorative stick pins to the flower on the photo frame, they are by K & Co but you can add any decorative elements you would like or that you feel enhance your plaques and make then personal touches.

Now we are ready to connect all the plaques together! Just like a train you are going to connect all three using your Ombre sheer ribbon, now for me I give myself a generous amount of ribbon to work with so I will be able to do a beautiful bow so I start with 3 pieces at 12" of ribbon then 2 pieces at 6". Then laying my plaque flat on my work space start with the top plaque and tie a loop through the first slot cut off any excess then take my second 6" piece and tie a bow at the top of the loop, this will hide the knot you did to form the loop. Next go to your bottom slot and take one of your 12" pieces of ribbon and pull one end through the bottom slot of plaque one and the other end through the top slot of plaque two. Then pull plaques about 1" apart from each other and tie ribbon into knot first then on top of that tie a fancy bow.

Cut off any excess dangles. Take your second piece of 12" ribbon and pull one side through bottom slot on second plaque and then the other side through the top slot of the third plaque and just like before make a 1" gap between the two plaques and knot ribbon then tie bow. With your last piece of 12" ribbon tie in a bow through the bottom slot of the third plaque and you might want to leave the dangles long on this one for a cascading effect. I then took a glass dangle by seven gypsies and hooked that through the ribbon.

And the last thing you do to finish this project is your little bird at the top of your plaque, I took a pink bird I found at my local craft store and using one of the pink prima flowers and a small piece of the yellow and pink organza check ribbon created a little bonnet for my birdie. I took 5" of ribbon and folded it in half then pulled it through the hole in the center of the flower to form a little tie then using a glue dot placed the bonnet on the bird head and pulled around my ribbons and secured at her throat with another glue dot. Then finished off the look with another pink gem. I then carved a small section from her under part using my exacto knife to the size of the plaque edge and placed a strip of redline tape in the carved out section and placed her on the top of my plaque. To reinforce her I used a touch of glossy accents around the connection of her to the plaque and let it dry over night.
Also to enhance your plaque you can use a little Smooch inks, by Clearsnap, and this will add a bit more shimmer to your stamps, flowers, and frames!
And there it is a stunning Fripperies inspired spring project that is perfect for your studio, office or bedroom. I love using ribbon to enhance projects and find sculpting and creating three dimensional designs is a wonderful added element. Have fun creating and remember to tie up the perfect project use May Arts Ribbon!
Happy Crafting!
Leanne
TOOLS YOU WILL NEED FOR PROJECT:
May Arts Ribbons; ABB46, AE27, NP46, 370-14-12, Three sheets of 12” x 12” papers Echo Park “Be Mine”/Marah Johnson by Creative Imaginations/ Hayloft by Basic Grey cut to 6” x 6”, Liquid Adhesive, ½” red line tape, mini Glue Dots, Mini Pop Dots, Fairies stamps by Gecko Galz, 1 sheet of white card stock, frame punches/ die cuts/ or templates, Library Pocket template or die cut, Prima Dark pink flowers, Pink Bubble Gum Glimmer Mist, Pink/Green/Gold Smooch Inks, Fake feather bird, Glossy Accents or Diamond Glaze, Peeled Paint Distress Ink by Ranger, Pink ink by Color Box, scissors, Gecko Galz “Beautiful Butterflies” Collage sheet, 7 Gypsies glass dangle, Creative Imaginations square wall plaque.


